Friday, 27 July 2012

kuyaDROID v3.2.175


  • Feature:
    • Latest CM7 nightly feature (not everything)
    • 3MP Camera
    • LED notification
    • Power option reboot to xrecovery
    • FM Radio and VGA Camera/Video
    • Auto Brightness and new Performance setting (thanks nobodyAtall)
    • Dual recovery with multiboot option
    • SD and Ext App2sd
    • Back button ends call
    • MDDI, overclock, undervolt, gesture (thanks to doixanh)
    • Multitouch and smartass governor (thanks to AnDyX)
  • Requirements:
    • Latest baseband version xxx15
    • xRecovery
    • CWM recovery (since v2.6.xxx and above)
  • Instructions:
    • It is important to backup your latest Rom
    • Be careful to select the recovery for the update.zip
    • In recovery select "install custom zip", or you can rename it first to "update.zip" then select "install update.zip from SD Card"
    • If you came from CM7, the update zip would not remove your data partition, its only removed cache and dalvik-cache.
    • If you upgrading from eclair or froyo, do "Factory reset (full wipe)"
    • Reboot. first boot will take a while and wait for a moment before using it.

The link to download the rom:
kuyaDROID v3.2.175

LinuXperia FreeDom RC1

             
This is the screenshot of this rom:         


Features:

* CM7.1 Hero BASED (Xgin)
* Battary Drain Sysctl Tweaks
* LinuXperia Transparent Theme
* Supercharger tweak
* New Sound
* Multilanguage
* Xrecovery and Cwm Recovery
* Boot Splash Logo (LinuXperia Logo)
* LinuXperia Salt Logo ( Setting)
* New Logo
* Xgin Tweaks
* Permissions Tweaks
* Scrolling 3d on games
* Dolphin Browser (Deleted Stock Browser)
* Real Calculator
* Lockscreen Lx
* Full Wifi(Stock Version)
* SuperSu# Thanks : Chainfire
* Extra CM Performance Settings menu for SD Read Cache Speed
* Extra CM Settings display menu for Ultra brightness
* Smooth 2D scrolling in menus
* Fake Dual touch in kernel


The step to install this rom in your SE Xperia X8:
1.You must do it this steps first, you can see it HERE
2.xRecovery & CWM.
3.Stock Kernel
4.Full wipe and Cache and Install rom
5.Reboot Phone
6.Not-working, Full-wipe


The link to download the rom....
LinuXperia FreeDom RC1

Tuesday, 24 July 2012

Stronmix V.2

The screenshot of this rom


The steps to install this rom, you can follow here:

The Link to download the rom


CM-X

 The screenshot of this rom


Please follow the step at here:

The link to download the rom


Ginger Jhv5 Linux Version


This is the screenshot of this rom


Follow this step to install this rom.

1.Download the rom and the file lib kgsl then enter the memory card.
2.Enter recovery mode.
3.Flash / rom installed with the "custom install zip> choose from sdcard"
4.Flash / lib install file install rom kgsl same as above.
5.Do not forget to full wipe / wipe and wipe data cache.
6.Then wipe DalvĂ­k cache.
7.Reboot and enjoy.


Link to download the file here:


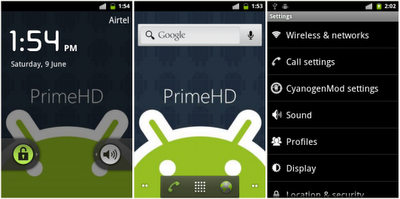
Prime HD 9.0

This is the screenshot of Prime HD 9.0.


Steps to install this rom in you SE Xperia x8....
1.Dowbload the Prime HD 9.0 rom and the Add Ons
2.You do not need to extract the rom file, but you only need to put these two files into 
    your SD card
3.Please set the mode in CWM and after that choose 'custom zip
4.Do not forget to do the full wipe 'and' wipe the cache.
5.After that, you need to install the 'Add Ons' file in the same way as you install the 
   rom. (IMPORTANT)
6.Lastly restart you android and enjoy.


Link to download

Ginger DX v027.


Ginger DX v027.


The latest specification is in this rom are:
DeskClock: "Shake to Snooze Alarm" by AChep
Updated ES File Explorer to 1.6.1.6
Updated Nemus Launcher to 1.6.3
Updated SuperSU to 0.90
Russian translation updated by yarik2720
Merged CM9 backports from aspee (LG P500 GingerDX Port)
Kernel samepage merging (for Alfs v09+)
NOTE: This feature only works on Alfs v09+ and will have no effect on Stock Kernel or Alfs v08 (or older).
To enable KSM: System settings -> CyanogenMod settings -> Performance
CHECK "Kernel samepage merging" to enable the feature.
Be warned that this code is considered UNSTABLE and may cause unexpected problems.
Try at your own risk!
Current CPU Frequency
Shown at: System settings -> CyanogenMod settings -> Performance -> CPU settings

The instruction this install this rom you can see here.

Thursday, 21 June 2012

Upgrade SE Xperia X8 from android 2.1 - 2.3


 TAKE NOT.......
> Before you try this method, make sure you backup you contact, because this process 
   will remove all the things that already in you phone.   
> IT Technology will not be liable for damages caused to your phone if you try this thing 
   but you can repair your phone with use the software that mention at the bottom this 
   page.

              This time I will teach you ways to upgrade Sony Ericsson Xperia X8 from android version 2.1 to android version 2.3 with easily to do this process, there are three steps to be taken. Please make sure you follow all the steps that have been prepared.


Step 1 ( root )
1. Please check the baseband and make sure it ends with 015
2. Download the setup Net Frametwork and install the software into your computer
    DOWNLOAD HERE
3. Download the setup Pc Companion and install the software into you computer
    DOWNLOAD HERE
4. Open the  Pc Companion and then connect the X8 using the usb cord and 
    wait 2-3 minutes to allow the driver to install and then unplug the usb cord.
5. Go to phone settings, application then tick unknown resources and after that tick
    usb debugging. 
6. Download superoneclick, and then extract it into desktop.
    DOWNLOAD HERE
7. Press the root button, and click yes then just wait until finish. 
8. Lastly, restart your phone.


Step 2 ( install xrecovery )
1. Download X8 x recovery and extract then entered into the sd card.
    DOWNLOAD HERE
2. Install root installer app or use explorer file manager to find the root file explorer.
3. Open root explorer and go to the sdcard looking for three things which were included in
    the memory card just [chargemon-busybox-xrecovery] copy the three files 
    by press menu button and select multiselect then select 3 file and copy.
4. After copy, press MOUNT button  then go to the system, after that bin and paste the 
    files in the bin.
5. Restart your phone, and when the word  Sony Ericsson displayed press back button 
    several times.
6. Go to custom install the zip, then select choose from sdcard just select the file and 
    press install wait until the end.
7. When the install is done go to the factory reset and press yes to delete all user data.
8. Lastly restart your phone.
9. If you do not understand all the steps above, watch video provided


Last step ( install the new rom )
1. Please backup your contacts by going to the contact .. press menu and select export 
    to sdcard.
2. Download the new rom for Sony Ericsson Xperia X8 
3. Without the need to extract just enter the file into memory card
4. Enter xrecovery mode by restart your phone and when sony ericsson displayed press
    back button several times.
5. Go to the custom install zip then select choose from sdcard just select the file and 
    press install wait until the end.
6. When finished install  go to the factory reset and press yes to delete all user data.
7. Restart your phone. Now you can use the with the new version of android.


Information.
If you fail to do this process and cause damage to your phone as your phone will display the icon Sony Ericsson more than 5 minutes you can repair you phone with use this software. Follow all the step given, and your phone will appear as usual.